Introduction
By looking at this resource, it is likely that you have a child who you think may have a movement and/or skill development need.
Remember that factors influencing a child’s movement skills may include:
- The child’s general development
- The child’s level of experience and practice
- The child’s vision and hearing
- The child’s understanding, attention and listening skills
- Any genetic or medical issues or conditions
To use 1st Move, look at the units of motor skills and follow the key principles of the resource.
The Motor (movement) skills supported by 1st Move are divided into eight units, as shown in the contents. Each unit is in its own section for ease of use.
Where a skill area outlines a range of ‘Component Skills’, these can be found in the ‘Core Skills’ and ‘Fine Motor Skills’ units.
Some children may require specific support to develop their motor skills at some point of their development (by motor skill, we mean movement, fine hand skills and self-help skills). Children may need support due to lack of early experience, opportunity to develop motor skills, delayed development or motor difficulties.
1st Move is a resource intended for use both by parents/carers and in nursery/schools by teachers and support staff.
It is written to be a ‘child friendly’ approach focussing on skill development. 1st Move emphasises functional skill development. The emphasis is on quality movements and it is important that time is invested early on to promote these good quality movement patterns.
- Key ideas:
- Quality (quality movements count – keep it short and focused)
- Regular practice (short, regular practice will make a difference)
- Big to small (all movements start big before refining to small - allow children to develop increasing precision by allowing them to start with big actions on a big area)
- Utilising existing skills (each child will have a range of existing skills – allow the child to use them)
- Teach new skills ( teach new skills – be specific)
- Minimise frustrations and develop coping (whilst the child is learning and practising new skills, support them to have some coping strategies in place until they have mastered the new skills)
- Generalise (use the new skills in a growing range of situations and practise them in a functional manner)
- Environment (where is the skill going to be introduced/ practised?)
- Use appropriately sized equipment (using appropriately sized and working equipment makes a difference to the success of children’s acquisition of certain movement skills)
- Make it interesting!
Movement is a complex activity. From the ages of 0-5 years, given the opportunity, we normally develop the basic components which form the foundations for the development of more sophisticated skills.
The child must have a basic understanding of his/ her body in space and its relationship to his/her environment; the strength to move and maintain postures; the balance to carry out movements or remain still.
Therefore, it is important that the child is exposed to experiences that allow him/her to practice and practice again movements that develop these core skills.
|
Components of Core Skills |
Associated 1st Move programmes |
|
Balance |
Balance |
|
|
Jumping |
|
|
Hopping |
|
|
Skipping |
|
Strength |
Strength |
|
Understanding of body schema and position in space |
Body awareness Strength Knowledge of right and left Bilateral coordination/integration Spatial awareness |
|
Visual skills |
Recognition and visualisation Visual perception Visual recall |
What to do next
When developing core movement skills, remember, focus on:
- Regular practice
- Careful consideration of when and where to practice
- Giving sufficient time (it always takes longer than adults expect!)
Balance can be thought of as being of two types:
- Static – stationary balance
- Dynamic – balance whilst moving Both of these are important skills.
Foot Strengthening
Foot strength is an important aspect in developing balance. The activities are fun and can be worked on individually, in pairs, small groups and practised in
P.E sessions. Many of these could be incorporated into the warm up during P.E to allow even more practice. Remember, make it interesting!
- Walk on different parts of the feet i.e. heels, toes, insides, outsides
- Walk along lines on the floor, changing directions, on toes, heels etc
- Sit on floor and point toes up and down, make circles with ankles
- Pick up bands, pencils or rubbers with toes
- Stamp feet (not too hard!) whilst marching up and down
Static balance
Stand on one leg
Child stands between two chairs holding back of each chair with one hand, child lifts one leg off the floor and assumes a ‘stork’ position with heel to opposite knee, but not touching. Encourage the child to hold a still posture for five seconds. Now, alternate legs (at this initial stage it may be necessary to help the child achieve this balance)
- Hold the stork position with a still posture for five seconds. Remember to practice with both legs. Use a chair either side for support.

Progression
- When the child can assume the above position independently; progress to:
- Chair (weight bearing side) is removed and posture maintained
- As above, encourage child to leave only one finger on supporting chair
- Lift finger off the chair, slowly, keeping original ‘stork’ position
- Now encourage child to assume and maintain position without chair
Balance on various parts of the body
Instruct the child to balance on specific parts of the body eg.
- Two hands and two knees
Progression
- Reduce number of contact points
PLEASE NOTE: This activity links well to many of the ‘points and patches’ activities in PE lessons.
Statues
Statues are a great static activity to promote balance, as well as body awareness, strength and working with a partner. These can be worked on individually, in pairs, small groups and practised as part of PE lessons.
REMEMBER: clean floor/mat! Also, balance activities are more effective with bare feet.
Child assumes 4-point kneel position whilst partner gently pushes him at shoulders or hips to the right or to the left, forwards or backwards. Child tries to remain stationary. More pressure can be exerted once child understands the concept.

Progression
As the child becomes proficient at each shape, move on to the next shape. Don’t forget – these would complement the gymnastics/ PE curriculum too!
As with the 4-point kneel position but now in a cross legged position. The partner needs to be careful. The aim isn’t to push the child over but to allow them to resist the push.

Now try the heel position.

Next we have the half kneel position.

In this shape, the child starts with the four point kneel and straightens one leg out backwards and tries to balance on the three remaining points.

In this shape, the child starts with the four point kneel and straightens one arm out in front and tries to balance on the three remaining points.

Dynamic balance
Stepping
-
Child steps into hoops placed touching on the floor in different patterns (see diagram 1)
-
Child steps onto bean bag (positioned like the hoops – not on smooth floor)
-
Child steps into hoops placed at various heights on cones
-
Child walks between skipping ropes placed 20 cm apart (see diagram 4)
-
Wiggly skipping ropes (see diagram 5)
-
Reduce distance to just wider than child’s foot
-
Walk forwards, backwards, sideways along a line with or without beanbag on head
-
Walk along an upturned bench, hand held and then progress to firm object held between child and assistant eg. a hockey stick and then progress to a flexible object such as a skipping rope where the assistant can give or take as much tension as possible.

PLEASE NOTE: Some children find it difficult to hold postures against gravity. If the major extensor muscle groups are strengthened, the child can assume a more extended posture allowing the limbs to work from a more secure base. Remember the principle of quality movements.
- Adequate muscle strength and joint stability around the shoulder girdle is an important factor for hand function (handwriting, scissor skills and fine motor skills)
- Adequate muscle strength, joint stability around the hips is required for standing on one leg, hopping and kicking a ball
Equipment
- Mat
- Bean bag
- Football
- Bench
Activities
PLEASE NOTE: All exercises should initially be held for a count of five seconds unless instructed otherwise and repeated five times, as strength improves increase both the length of time the exercises are held for (aiming for up to 20 seconds) and the number of repetitions (aiming for ten) to further develop muscle strength.
Press ups
- Use the 4-point kneeling position (see statues exercises in the section on balance). Make a press up from this position. This exercise should use the arms to push up – ensure the effort comes through the arms
Banana
- Lying face down, arms straight out in front and symmetrical. Lift arms up, keeping them straight and in front of the body
- Lift arms and legs at the same time (keep arms and legs straight and symmetrical)
- From the lying face down position, lift arms and throw a ball at a target
Bridging
- Lying on the back, arms by sides, knees bent and feet flat on the floor (legs symmetrical but not touching) in a sit up type position. Keep head firmly on the floor. Lift hips directly up keeping knees apart and hold for a count of five seconds and slowly lower back down. Repeat
Sit ups
- (Follow PE safety guidelines) Lying on back, knees bent up, feet on floor, tuck chin in towards chest, arms down by sides. Slide both hands up legs (symmetrically) towards knees. Hold for a count of three seconds and slowly slide back to the floor (keep chin tucked in until the end of the movement and avoid rapid or bouncing actions)
Reversed sit ups
- (Follow PE safety guidelines) Adopt the sit up position (knees bent, arms by sides). Lift legs (knees bent at all times) up towards chest. The action is made slowly, up and down.
The task can be progressed by putting a bean bag between ankles and encourage child to place or ‘throw’ bean bag into a hoop above his/her head
Step ups
- Step up onto a bench. With the leading foot, step down. Repeat x 10. Alternate feet (encourage rhythm and upright posture)
- Progress, stand on bench facing lengthways (child may need support to maintain his/her balance), lower one leg to touch the floor with toes and then stand back up (upright posture). Alternate legs. (This activity is a bit like dipping a toe into the water at the swimming pool!)
Star jumps
- Stand straight, arms by sides. Jump into a star position, arms and legs wide. Jump back straight position. Repeat x 10.
- Progress: stand straight, feet apart, crouch and touch floor and then jump into a standing star position
Shoulder girdle stability activities
Below are some specific activities to promote shoulder stability.
- Pulling own weight eg. along a bench, with progression to an inclined bench
- Games and activities that involve taking weight through arms eg. hanging on rope, climbing up a rope and hand walking along an overhead ladder
- Push ups against a wall or on the desk as preparation for fine motor activities or handwriting
- Drawing vertical lines on a chalk board (one or both hands). Keeping arms out straight draw by bending and straightening at the knees. The child has to keep the chalk against the board as he/she moves. If this is too difficult, ask the child to draw parallel vertical lines with straight arms working from top to bottom and then reverse. Progression is to draw diagonal lines on the chalkboard
- Draw shapes on chalk board with arms out straight. Circles and figures of eight are most effective (remember, arms outstretched)
- Paint on the wall with a roller or pasting brush (water can be used on outside walls in warm weather). The weight of the paint and brush/roller adds to the effectiveness of this activity
- Encourage games that require some shoulder strength eg. badminton, tennis and racquet ball (ball attached to a cord). Volleyball and basketball would be progressions in the area of strength
Other activities which promote strength
- Hop scotch
- Crab football (a game of ‘football’ but the players move on hands and feet, face up, bottoms lifted off the floor)
POINTS OF NOTE: Children with low muscle tone (floppy muscles and/or excessive joint ranges) often have poor body awareness. Messages from muscles and joints (proprioceptors) let them know the position their body is in; the awareness of the position of body parts
in relation to each other and their environment and the force of the movement the body makes. This is important as it helps the child organise and plan activities and make automatic adjustments to the movement eg. judging how to manoeuvre through a classroom with speed and not bump into things.
To improve proprioception, children need lots of activities against resistance or with pressure to enable them to become more aware of their body positions, such as push and pull activities.
Equipment
- Three gym mats
- Bench, ball
- Rope
- Chair, desk
Activities
- Child is instructed to clap hands hard, stamp feet and clap named parts of the body. The child is then asked to stop and feel the body parts ‘tingling’
- Log rolling: lie at one end of a line of three gym mats and roll to the other end with arms raised
- As above, but hold a ball
- Lie on stomach on a bench and pull forwards along the bench, once at the end push backwards move in the opposite direction
- Statues: (see balance) hold ‘high kneeling’ position whilst partner tries to push you over
- Tug of war
- Bunny hops: encourage the child to have weight through their arms
- Star jumps
- Chinese tug of war: stand back to back, bend forward and grasp right hands between legs, pull partner to opposite wall (ensure safety guidelines are followed)
- Desk push ups: in standing place hands on desk and lower nose to surface and push up
- Sitting push ups: sitting at desk place hands on either side on seat and push down lifting bottom off the seat
- Sitting pull ups: place hands either side of seat and pull up
POINTS OF NOTE: Many children are confused about the right and left sides of their own bodies creating difficulties for them in everyday life. Children need to be able to internalise the knowledge of right and left so responses become automatic and instantaneous.
Equipment
- Sticker or stamp
- Hoop: red
- Beanbag: red
Preparation
- Stamp or stick red sticker on back of right hand
- Use reminder – “This is the right hand and this is the one that’s left”
Activities
Physical and verbal cueing
- Adult touches the right arm of the child and instructs the child to take two steps sideways to the right. Repeat, but this time on the left
- The child holds a bean bag in each hand. The adult cues the child to throw by touching the right arm with a verbal cue ‘throw with your right hand’. Repeat but with the left hand
Verbal cueing only
- Repeat as with the physical cueing but only use verbal cues
- Rhythms: Tap out rhythms with right hand eg. “Baa baa black sheep”
- Throwing: Throw red beanbag in red hoop, placed to the right of child
- Hokey Cokey song – ‘Right hand in…’
Movement from left to right
POINTS OF NOTE: Gross motor movements from left to right will help reinforce the movement patterns required for writing. These exercises should be carried out using the child’s writing hand.
Equipment
- Bench
- Hockey stick
- Quoits, beanbags
Activities
Move quoits
- The child is placed behind a line 1m away from a bench and the child lifts each quoit with a hockey stick and puts it over the bench. The child starts at the left and works down the line to the right
Progress:
- As above but pushes off bean bags
- Child sits in a hoop and carries out the above
- Skittles placed in a row and the child rolls a ball to knock each one over starting at the left and working down the line to the right
- A ball is placed on a bench at the left hand side and the child is instructed to move the ball along the bench to the right using a hockey stick
Move along children
- A line of children side by side passes objects along the line starting at the left and passing to the right. The one at the end runs to the beginning of the line and starts again
POINTS OF NOTE: This refers to the ability to coordinate both sides of the body either reciprocally or bilaterally.
Equipment
- Beanbags
- Beam
- Line on floor
Activities
Pivoting
- The child sits on the floor and lifts feet up. He/she then propel themselves around in a circle using their arms. He/she turns three times in one direction and then three times in the other
Progress
- Pick a beanbag up with feet and turn 180° to put the beanbag in a hoop placed behind them
- Same activity but lying on their front, pivoting on their front
Walk the line
- Walk sideways along a line, crossing one leg in front of the other, change direction (ensure the child does not twist their trunk)
Progress
- As above but walk along a beam
- Sideways jump – jump sideways in one direction and then the other
Bean bag walk
- Place bean bags as below:

- Child walks along a line stepping on each bean bag
Progress
- Step with right foot on the bean bags placed on the left and vice versa
Progress
- Stand astride a beam and walk the length of the beam crossing legs over it. Encourages knees to be lifted high
Bat and ball
- Throw the ball into the air with the non-dominant hand and hit the ball with the bat held in the dominant hand
The child should be able to move both arms and hands in the same movement pattern in a smooth coordinated manner before working on these activities (as prepared in the bilateral coordination activities). Bilateral integration activities are intended to improve ability to use either hand for different functions.
One hand leads the activity and the other hand assists.
Position
Be sure the child is positioned the same on both sides of the body (symmetrically) for any bilateral (two-handed) activities, with both shoulders and both hips the same distance from the desk/table.
Position objects in front of the child in the midline of their body.
Activities
This skill will develop with the practice of a range of activities that require different movements from each hand.
Jars and containers with lids
- Have the child open and close a variety of twist-top or flip-top containers. Materials and toys can be stored in closed containers. The child gets materials out and puts them away. A box full of jars filled with attractive small objects such as stars, stickers and other interesting items can be used as part of the task and as a reward
Cutting with scissors
- Encourage child to use one hand to hold and manipulate paper while the other hand operates the scissors
Paper and crayons
- Colouring or drawing in pieces of paper encourages stabilisation/fixing as the paper moves unless held steady (however, remember that colouring should start with big movements before moving to precise colouring)
Templates
- Tracing around plastic shape templates, or making rubbings with a crayon encourages stabilisation/fixing with the non-preferred hand so that the tracing or design will be clear. These activities provide visual feedback about how well the paper or template was stabilised and progress can be seen clearly. Adults can provide verbal feedback if the child needs further information
POINTS OF NOTE: For a child to plan and organise his/her movement he/she must have good understanding of his/her body in space.
Equipment
- Bean bags
- Hoops
- Skittles
- Ball
Activities
Distance practice
- The child throws bean bags into hoops placed at varying distances in front of him/her
- The child throws bean bags into hoops placed at points 360° around him/her
- Mix distance and direction
- With a bean bag, knock skittles down placed at different distances and directions
Dodge the hoops
- Place six hoops around the gym/hall. Have the child run in and out of the hoops, putting red beanbags into red hoops, yellow into yellow etc.
- Lay a path of hoops in a line and have the child jump (or step) from one to another without touching them (the greater distance being the child’s height)
Roll along the wall
- The child stands facing a wall with a ball between the wall and child’s stomach. Child rolls self along the wall, keeping the ball between body and wall
Knowledge of shape
Equipment
- Bean bags
- Hockey sticks
- Skipping ropes
- Ribbon
Activities
Making shapes
- Help the children make large shapes on the gym/hall floor using skipping ropes. Use the bean bags to identify the beginning and end of the shape or points for changing direction eg. the corners of a shape. Have the child walk around the shape, forwards or backwards
- Draw the shapes on large white board
- Draw the shapes in the air with a ribbon
- Have the child lay out shapes on the gym/hall floor from memory, using a collection of beanbags, hockey sticks and skipping ropes
- Have the children make shapes with their own body eg. a T shape or circle
- Have the child walk a shape, or move to form a shape from recall
Recognition and visualisation skills
Sometimes children need support to improve their ability to recognise and recall shape, letter and number formations. Multi-sensory approaches can be used when presenting material. It is helpful to consider all sensory modalities (including touch, sight and sound). If visual information is confusing for the child, or he/she has strengths in kinaesthetic perception, they may benefit from emphasising movement and touch when teaching shape, number and letter forms.
Examples of activities that emphasise touch and movement include:
- Practising writing big letters and shapes on white board/black board
- Lots of repetition of motor patterns for letters, with eyes closed
- Use of tactile alphabet
- Writing in damp sand with a finger
- Writing spelling words in paint
- Writing with crayon on paper over a textured surface
- ‘Air writing’
- The use of letter strips fastened across the top of the desk/table may assist with writing when letter and numerals can be recognised but cannot be recalled quickly
- Using joined writing to recall spellings (as appropriate)
Multi-sensory approaches also reinforce letter learning through linking sound with visual and motor patterns (see First Call for materials focusing on auditory perception and recall)
Visual perception
This is, put simply, interpreting what is seen. It is a complex and very important activity which allows us to make sense of what we see. There are a number of areas that are important to develop and need to work together for good visual perception.
Visual discrimination
This is the ability to recognise the main features of different objects eg. colour, shape, position and letters and numbers. This is important in all visual perceptual skills. It is important to help the child to spot things that are the same or different about objects (start with two objects as the child develops his/her skills).
Activities
- Look at shapes and spotting things that are the same and different eg. shape, colour, size
- Look for visual similarities and differences in real world objects
- Sorting exercises. Use different ways of sorting things eg. by colour, shape or maybe even size
Visual figure ground
This is the ability to see an object as distinct from its background or surrounding objects.
Activities
- Pick out items from a box (eg. all the red objects)
- Find a shape in a box of other shapes eg.
a cube in a box of beads (make it obvious to start with and gradually build in difficulty)
- Picture books where the child has to look for something that is ‘hidden’ eg. ‘Where’s Wally’ or Richard Scarry’s Cars and Trucks and Things that Go’ where he/she has to search
for ‘Goldbug’
- Looking for objects in the environment eg. asking questions ‘Can you point to the blackbird?’ (This would be a great way to involve home)
Visual form constancy
This is the ability to recognise an object or shape when it is seen from different angles.
Activities
- Reinforce the idea that shapes are the same, even when other variables change eg. colour, size or orientation
- Look for shapes in the environment eg. ‘how many circles/squares/triangles can you find in the classroom?’
Visual spatial relationships
This is the ability to recognise how objects are positioned in relation to your own body and other objects.
Activities
- Use construction toys eg. Lego
- Copy simple 2d block design and patterns (progress to 3d design)
Visual closure
This is the ability to recognise a whole object when only a small part can be seen.
Activities
- ‘Can you guess what it is?’ games – reveal a small amount of a shape/object and encourage the child to work out what is hidden object
- Complete the shapes games – the child completes a shape from being given part of it
Visual recall
Visual recall is the ability to remember things which have been seen. Sometimes children may benefit from opportunities to develop their visual recall skills. This may be particularly relevant for children who:
- Cannot remember non-verbal experiences
- Have language difficulties and are heavily reliant on visual recall
- Can reproduce a given symbol from a model, but cannot reproduce it when model is removed
- Misspells a word several different ways on the same paper
- May be able to remember all letters in a word, but gets them in the wrong sequence
- Has difficulty in L ➔ R progression
- Makes mistakes when copying from board
Activities
- Arrange a pattern of coloured beads on a string. Show the child the arrangement briefly then ask them to string the beads in sequence from memory
- Ask child to draw a picture of an activity they enjoyed during the day. Ask the child to describe activity using the drawing as a reference
- Kim’s game
- Arrange pictures in order, allow child to look, then rearrange and ask child to put in original sequence
- Take child on walk, pointing out several objects. Ask child to describe or draw a picture of what he/she saw and see if items specifically mentioned are included
- Word searches
- L to R mazes which require working from L ➔ R
- Treasure Hunt – let child see where objects are hidden, then try to find them
Once the basic Core Skills are in place children will begin to develop more complex movement requiring greater levels of strength, balance and
understanding of body in space. The development of these extension skills will only be possible if the Core Skills are in place.
Jumping, hopping, skipping depend on the ability to alternate between static (stationary) balance and dynamic (moving) balance. They are often best learnt by breaking the skill down into smaller more manageable components. It is also useful to introduce rhythm with repetition into the movements.
|
Components of jumping, hopping, skipping skills |
Associated 1st Move programmes |
|
Maintain upright postures |
Strength Knowledge of right and left |
|
Alternate flex/extension postures |
Balance |
|
Understood body in space |
Movement right and left |
|
Developed balance system |
Bilateral integration |
|
Strong dynamic movement |
Body awareness |
When developing jumping, hopping and skipping skills, remember, focus on:
- Regular practice
- Careful consideration of when and where to practice
- Allowing for the child’s level of development
- Using it in real situations
- Giving sufficient time (it always takes longer than adults expect!)
Jumping
POINTS OF NOTE: On jumping, emphasise how the knees should bend, the bottom should lower on landing and the landing should be on the toes.
Equipment
- PE mats
- Bean bag
- Hoop
- Cane
Activities
Swing up, swing down
- Child stands with knees slightly apart and bent knees. Arms are positioned behind. He/she is then instructed to raise his/her arms forwards and upwards and stand on his toes. Repeat until fluent, “Swing up, swing down”
- “Swing up” and jump to reach a bean bag
Jump off step
- As above but jump off small step eg. two-three gym mats (may need to hold hands initially)
- As above, jump off into a hoop placed in front of step (encourage knees bend and feet together)
Jump forward
- Jump from mat onto floor
- Jump over raised cane at height to succeed
- Stand and jump forwards, measure distance
- Jump backwards, sideways
- Place hoops on ‘hop scotch’ position, jump two feet together, two feet apart
Hopping
POINTS OF NOTE: A child must have established one leg stand before attempting hopping, and ‘warm up’ with jumping, emphasising bent knees and landing on toes.
Equipment
- Two chairs
- Trampette
Activities
- Child, supported by partner or chair, stands on dominant (preferred) leg and bends other behind as in ‘one leg stand’. He/she then raises himself on to toes and down again onto bent knee. Once carried out fluently progress.
Progress:
- Practice hands held on a trampette
- Holding onto chair and attempt hop
- Activity as above but not supported (or supported with object such as skipping rope so you are in control of support given)
- Bends knee and encouraged to hop forwards over a line
- Alternate legs
- Activities as above but not supported on preferred side
- Once established on dominant leg practise on non-dominant leg
Skipping
POINTS OF NOTE: Skipping can only be developed once the child can hop on either leg.
Equipment
- Mat
Activity
Step, hop
- Practise hopping either leg first
- Hold the child’s hand and talk through ‘step hop, step hop’ (a rhythmical voice pattern and a large area is needed to consolidate the pattern)
- Gradually increase speed and distance (some children find a quicker speed easier than a slow one!)
Activities to use jumping, hopping and skipping
- PE activities
- Playtime games
PE activities
Depending on the child’s age and development, many PE sessions will require jumping, hopping, skipping and movement. During these lessons, it is important to remind the class of good technique and this may allow the child to apply what they have practised
Playtime games
- Jumping, hopping and skipping may be fun in their own right!
- Many of the markings on modern playgrounds facilitate games that could include jumping, hopping and skipping
- With a little bit of guidance, many traditional games could incorporate jumping, hopping and skipping
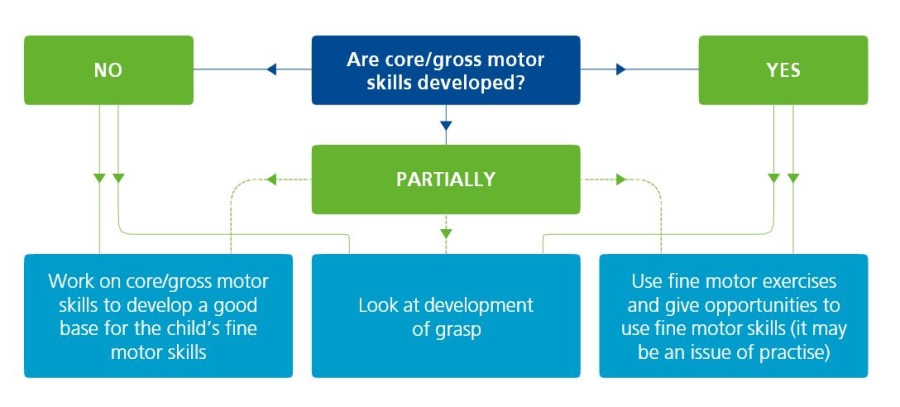
It is important to appreciate that the development of fine motor skills is likely to be more successful if the child has established sound gross motor skills.
In typical development, babies establish basic gross motor skills by playing and exploring their environment. They develop strength and balance skills allowing them to achieve upright postures, learn about their bodies and their relationship to their environment. Soon they are in a position to begin refining their movements to accomplish fine motor skills.
Sometimes this pattern of development does not happen and there are ‘holes’ in children’s basic skills. This may be due to due to a genetic factor such a low muscle tone or from a lack of opportunity to experience, practice and consolidate skills.
Should a child be experiencing difficulties in writing, scissor activities or other apparently fine motor skills, it would be worth investigating whether there are difficulties in his/her gross motor skills.
|
Developmental areas important in fine motor skills |
Associated 1st Move programmes |
|
Physical Good proximal stability (trunk) giving the child a secure base to move his/her distal body parts (hands and feet). Good proximal stability can be achieved by practising the associated activities. |
Strength Body awareness Balance Hopping Jumping Body awareness Knowledge of right and left Spatial awareness Bilateral motor coordination Ball skills |
|
Perceptuo-motor These are the skills that give the child an understanding of his/her body in space. These include the knowledge of right and left and the ability to cross the body’s midline as well as the relationship between objects, distance and direction. |
Body awareness Balance Hopping Jumping Body awareness Knowledge of right and left Spatial awareness Bilateral motor coordination Ball skill |
Checklist
What to do next
- When developing fine motor skills, remember, focus on:
- Quality movement (short and focused)
- Practise regularly
- Using them in real functional situations
- Ensure activities are meaningful
Also:
- Allow for the child’s level of development
- All movements start big before refining to small
- Allow children to develop increasing precision
- Use appropriate motivational challenge
- Minimise frustration
- Use appropriately sized equipment
Normal development of pincer grasp

Fine motor activities
These activities are helpful in the development of fine motor skills in general and will be beneficial in developing thumb/ finger opposition to improve pencil grasp.
A stopwatch, egg timer or kitchen timer will be useful in providing a motivational challenge eg. giving children a target to beat the clock. Results may also be recorded on a table or graph as part of the activity.
Threading pasta
The child threads as many pieces of straight pasta onto the string or shoelace as he/she can in one minute. The pasta is picked up between the thumb and index finger, or thumb, index finger and middle finger. The task can be varied in difficulty by the size of the pasta and the stiffness of the string (a piece of sellotape on the end provides a suitable stiffener). The task can also be varied by which hand is used to hold the string.
Equipment
- A piece of string or a shoelace
- Pieces of straight pasta
Posting peas through a narrow neck bottle
The child holds a bottle firmly on a table with non-writing hand. He/she picks up the peas one at a time and posts through the top of the bottle. He/she picks up the peas between thumb and index finger. Progression is using thumb and middle finger and then (and this is hard for adults too!) thumb and ring finger and then thumb and little finger (this is really hard for adults too!).
Equipment
- Plastic bottle and dried peas (follow the school health and safety guidelines).
Making paper footballs for table football
The child places his/her ‘handwriting’ hand flat and stretched out on the piece of paper and the other hand behind his/her back. The child has to scrunch the paper into a ball by turning it in his/ her hand to make it round. Both hands can then be used to make a really tight ball. Progression is using alternate hands. The task can be varied in difficulty by the thickness of the paper. Thin paper eg. tissue paper will be easier and thicker grade paper will increase difficulty.
Equipment
- Paper
Flicking the paper balls
The child lines up the balls on the table and flicks the balls with each finger in turn to shoot at a target (this can be an ice-cream tub, washing up bowl, target on the wall). The child keeps his/her wrist flat on the table. Progression is alternating hands, then both hands at once and flicking with each finger in quick succession.
Equipment
- Use the paper footballs made in the previous activity
Flicking marbles
As above but with marbles.
Equipment
Marbles (follow the school health and safety guidelines regarding the use of marbles)
Flicking rice
The activity involves the child picking up the grains of rice by placing his/her wet hand palm down onto the rice. The child then turns his/her palm over and using each finger and the thumb, tries to flick off the rice until none remains (adults enjoy this activity too!)
Equipment
- Rice on a tray or in a container
Clipping pegs around a box
The child has to see how many pegs he/she can clip onto the box in one minute. The child uses thumb and index finger and progresses to each finger in turn on each hand. The child can reverse the process as part of the activity (the box may need a weight in the bottom to stop it falling over if all the pegs are removed from one side).
Equipment
Springy clothes pegs and a cereal box (with the bottom cut off and squeezed at one end to make it pointy and boat shaped).
Posting coins through a slot in a box lid or money box
The coins are posted one at a time through the slot making sure the child uses thumb and one finger.
Equipment
A box lid with a slot or a money box and coins
Picking up pebbles
The activity involves the child picking up as many pebbles in one hand as he/she can and then tries to let go of them, one at a time, into a container. Jacks could also be used in this activity.
Equipment
- Pegs and pegboard
Putting pegs in pegboards
The activity involves the child picking up pegs, one at a time, and places them in rows into the pegboard. The child can try placing the pegs vertically, horizontally or diagonally.
Equipment
- Pegs and pegboard
Squeezing sponges
The activity requires the child to empty the tub with the sponge by soaking it and squeezing the sponge with either or both hands.
Clearly, the task can be varied by the volume of water in the tub and/or by setting a time challenge.
Equipment
- Water, an ice-cream tub (or similar) and sponge
Roll and pinch pots
Make coil pots by rolling the dough/clay into strips. Make pinch pots by making a ball of dough, pushing the thumbs into the centre and pinching round in a circle to form a pot.
Equipment
- Clay or dough
Building a tower
The child, using thumb and index finger or middle finger, builds a tower as tall as he/she can before it falls down.
Equipment
- Building blocks
This progression activity requires the child to build a tower as tall as possible in one minute using one hand. Ensure the child gets to practice with both hands.
Equipment
- Multilink or Lego bricks
Shuffling cards
As part of any card game – but it may take a little bit of practice.
- Other activities that may be used to promote fine motor skills
- Baking
- Threading beads
- Binca sewing
- Playdough and Therapy Putty concentrating on pinching and rolling
Handwriting is perhaps the most complex perceptuo-motor skill that children have to acquire. It requires the simultaneous processing of a range of visual and often auditory inputs (eg. dictation) whilst producing controlled, complex movements using tools. See? We said it was complex.
Handwriting can be supported through handwriting specific activities but there are a number of components parts to help develop handwriting skills. If any of these skills are absent or poorly integrated, a handwriting difficulty may occur.
Below are the components which give the child a base to develop their handwriting skills. It is worth investing time to check these skills and use the programmes outlined below to develop these component skills. A child doesn’t necessarily need to have a pencil in their hand to work on skills to aid handwriting
|
Components of handwriting |
Associated 1st Move programmes |
|
Understanding of task |
No programme but check child’s understanding of what they think they have to do |
|
Attention and listening skills |
Look at First Call (the Lincolnshire Speech and Language resource) |
|
Visual Perceptual skills |
Visual Perception |
|
Good sitting balance |
Balance and strength |
|
Eye hand coordination Grasp and manipulation |
Fine motor activities |
|
Bilateral integration/coordination (mainly upper limb) |
Bilateral integration fine and/or gross motor |
|
Shoulder girdle stability |
Strength |
Development of grasp
The dynamic tripod grip (see below) is often seen as the model grip, but look around you, how many adults don’t show this precise grasp?
Lots of perfectly functioning adults exhibit far from model tripod grips, therefore apply this model sensitively, we want to empower children to mark make effectively and not be frightened because their grip isn’t ‘just so’. It is important to know the typical stages of pencil grip development. The decision about this should relate to what age and stage the child is at. Do they have other recognised difficulties that need to be considered?

Normal development of drawing skills
Drawing is a learned skill. Most children also follow a general order of skill development of drawing shapes. This follows an imitate, copy, drawing sentence.

Teaching handwriting
Imitation precedes copying prepared examples. Model it!

Pencil/pen grasp
It is a good idea to teach how to grip the pencil, as this will avoid the need for remedial action later on. It is important to show the child how to hold the pencil – model it! If you are teaching a left handed grip, use your left hand and for a right handed grip, use your right hand.

Development of pencil control
As children develop pencil control, the movement changes from large shoulder movements to controlled finger movement with the forearm resting on the writing surface. This is only achieved effectively when shoulder stability is established.
Remember, the control moves down from the shoulder to the wrist; to the hand; to the fingers. Static tripod grip (not moved by fingers) is often mistaken for a dynamic tripod where the movement comes from the end of the fingers and thumb.
- Shoulder
- Wrist
- Hand
- Fingers
Principles underlying good handwriting
Good sitting
Good sitting forms the basis of good handwriting.
Ensure the table and chair is the correct height. Taller or shorter children may need additional furniture or adaptation to existing furniture.
The principles of good sitting:
- Feet on floor (use footrest if necessary)
- Bottom to back of chair
- Forearms resting on table
Paper position
Many children will place their paper in such a way it prompts them to work in awkward positions. It helps to teach a good way to position the paper. Paper positioning is important to allow a view of the writing and to help prevent the development of a hooked grasp, since the writing hand will be below the line of writing.
Left-handed children should be encouraged to position their paper slightly turned to their right, with the left corner high. Right-handed children should be encouraged to position their paper slightly turned to their left, with the right corner high.

Letter formation
For most children the aim of writing will be to develop an efficient cursive script (joined up writing style). Incorrect letter formation can prevent this by stopping the pen/pencil where it cannot join with the next letter. It is important to observe the child’s writing process since letter formation is difficult to judge from the finished writing, as some children produce neat printing which is formed incorrectly and it is only picked up when they fail to join or are excessively slow. Others may sometimes print their letters and put the joins in afterwards – not a very efficient approach to writing!
Therefore, whilst the finished product of writing is important – the skill of handwriting is best observed as a process rather than the finished product. For some children, the development of fluency in cursive writing may be limited due to muscle tone, tremors or coordination – and for these children we may have to consider printing as the most effective way of writing.
Don’t judge a child’s handwriting by the product – watch the process of writing, it will tell you much more!
‘Left-handedness’
Left handed people make up approximately 10% - 15% of the population. They are generally
confronted by techniques and equipment designed by and for right-handed people. This can make life unnecessarily complicated for left-handed children.
There are a few key principles to keep in mind to help left-handed children:
- It is ok to be left-handed! Reassure the child – he/she may worry they are different
- Identify the left-handed children as early as possible. The best time is to do this as soon as they are being taught to hold a pencil
- Cursive writing was designed with right-handed people in mind. For left-handed children to succeed with writing, they need to learn correct paper position and pencil grip early on when learning to write, or they may develop a compensatory hooked grip which enables them to see what they are writing
- When demonstrating to a left-handed child use a left-handed style
- Left-handed materials are available and for some tasks they are vital for the child to achieve eg. left-handed scissors
- The direction of work may be different, eg. when cutting with scissors a left-handed child should be enabled to cut in a clockwise direction, where a right-handed child should be enabled to cut in an anticlockwise direction
- Be aware that some children will be using their left hand as a result of difficulty with their dominant side (eg. hemiplegia, and this needs appropriate and different consideration).
- Consider desk positioning within the classroom when accessing white board etc.
Activities and tools to promote good writing
Choice of writing implement can be important. Is the child using suitable writing implements that are matched to their stage of development? A chunky pencil for a younger child is usually a preferred choice. Remember the principle of big to small (thick pencils to thin pencils). Where possible, offer a choice of writing implements. Some children will prefer something which glides smoothly such as a gel pen; some children need the sensory feedback of a soft lead pencil.
Therefore, when promoting good handwriting, it may be worth considering:
- Shape, size and colour
- Comfort
- Effect on pencil control and writing
- Social acceptance (clearly a chunky, early years pencil may be less socially acceptable in an older age class)
Do:
- Try different types of pencils or pens
- Try pencil grips
- Use quality resources
Do:
Consider the writing surface as well. Blackboards give good sensory feedback; whiteboards provide very little sensory feedback. Different types of paper give different degrees of sensory feedback.
Many children will benefit from using an angled writing board/ surface, these can be bought or a simple homemade equivalent can be made.
Do:
Have a tool box of games which also promote good motor skills such as; cards games, construction toys, magnetic mazes, dressing dolls, lacing games.
Handwriting practice
Remember, quality movements, short and focused are key. Writing practice can seem boring, especially to those children who need most practice. Try to keep the work to small amounts and help the child to see progress. Give rewards – stickers, smiley stamp. The Lucky Letters Programme from Rainbow Road Resources supports this (see reference).
Never use handwriting as a punishment (this can devalue handwriting and demotivate pupils) – this sounds obvious but historically, this has not always been the case).
Remember:
- Make activities fun and enjoyable
- Catch their attention/interest
- Start with big movements i.e. painting onto large sheets or large pieces of paper, painting with water, mark making in sand or salt with sequins or cornflower. Be creative!
- When colouring, remember to start by colouring big areas before moving to smaller objects to colour. (If we move too small too soon, we may inhibit precision)
- Stabilise the paper using blue tac or masking tape if the child is not yet able to use the other hand effectively
- Use quality resources for writing
- Classroom organisation - ensure child is seated appropriately/ comfortably i.e. left/right-handed children. Ideally avoiding a clash of elbows
- Draw lines in straight or curved path – build it in to art sessions too
- Practise hand skills and pencil control in other ways such as colouring books, peg boards, threading activities, play dough, tracing paper. Some of these can be incorporated into the handwriting session eg. as part of a ‘warm up’.
Structuring the handwriting session
A handwriting session could consist of:
- Preparation activity
- Fine motor activity
- Pencil/pen activity
Starting position
- Good sitting position, feet flat
- Bottom back on chair
- Back straight, head tall
Getting ready or preparation activities
If a child finds handwriting difficult, it is a good idea to do some preparation activities to help with body awareness and posture before starting the handwriting.
Example 1
- Push ups on the desk
- Push hands together
- Sit straight; bottom back; reach arms into air above head
- Stamp/press feet down
- Massage/rub your writing hand with your helping hand
Example 2
- Sit on hands – sit on one, wave the other
- Hold edge of chair (two hands)
- Shake hands with a neighbour
- Push self up – lean right and lean left
- Lift (shrug) two shoulders
- Shake two hands in the air, then shake writing hand
- Shake up, down, fast, slow, one hand still, one hand shake
- Hands on table, talk about them
- Name them, name the thumb, fingers eg. index finger etc
- Touch them, rub fingers as you name them
Example 3
- Make two flat hands (thumbs out palm down)
- Spread fingers (thumbs touching)
- Close fingers and thumbs
- Turn them over (touch little fingers). Stand flat hands up (thumbs up)
- Put one on the other and cross them
- Lift flat hands and straighten arms
- One higher, one lower, one up, one down
- Make a V with two flat hands
- Rest chin in it
- Make an inverted V with hands, put on head
- Clap hands to rhythms (with increasing complexity)
- Clap hands then, clap hands on thighs or table or rhythms
- Increase complexity
Fine motor activity
A fine motor activity may be used as part of the handwriting session. This may be particularly useful in developing coordination and hand and finger control.
Example
- Using playdough
- Roll a ball in both hands
- Roll a sausage with both hands
- Pinch the top of the playdough sausage and bend it to make a shape or even the back of a Loch Ness Monster!
Pencil activity
Depending on the child’s development and skill, this may be a handwriting task but may include tracing, dot to dot or copying shapes. If the pencil activity leads to a specific handwriting task, it is perhaps best that practising individual letters is applied to words the children will need to write rather than simply joining up a row of the same letter (children need to develop fluency in writing words not a row of letters).
Benefits of using an angled writing board
The 20-degree angle of a writing board is considered to be the optimum position for writing and also assists with improved reading.
An angled board provides positioning benefits for the eyes, neck, shoulders, trunk, arms and hands.
A non-slip writing surface on an angled board provides increased proprioceptive feedback, helping to reduce pen, pencil slippage.
Stable and effective shoulder, elbow, forearm and wrist control is required for drawing smooth, controlled lines. This can be promoted by the use of an angled writing surface.
An angled board promotes wrist stability as both the wrists and forearms are resting on the surface of the board. By putting weight through the wrists this helps to gain more control at the join. This in turn can improve pencil control.
Effective wrist extension can improve voluntary finger movements (essential for handwriting).
Resources and suppliers
- Pre-writing Skills Skill Starters for Motor Development by Marsha Dunn Klein, M.Ed, O.T.R Therapy Skills Builders a division of the Psychological Corporation
- Handwriting Without Tears by Jan Olsen
- Write from the start: Unique Programme to Develop the Fine Motor and Perceptual Skills Necessary for Effective Handwriting
- Loops and Other Groups by Mary Benbow M.S. OTR. Therapy Skills Builder
- First Call: A Speech and Language Resource for Teachers by Lincolnshire County Council and Lincolnshire Community Health Service NHS Trust
Equipment suppliers:
- Homecraft
- LDA
- Nottingham Rehab
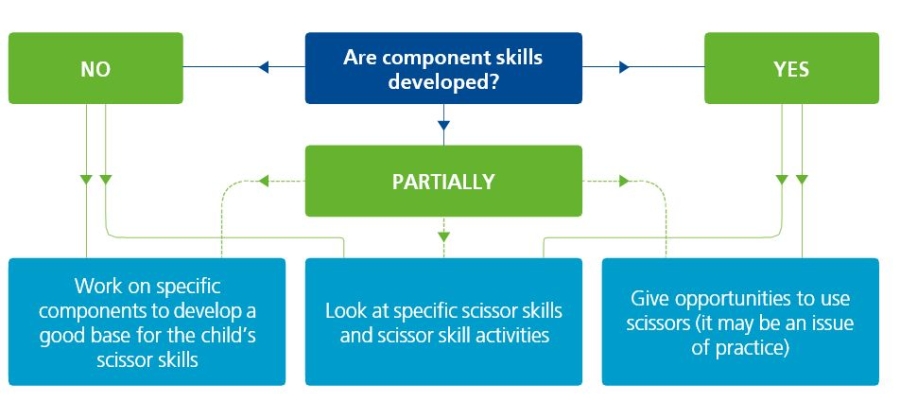
Using scissors is yet another complex perceptuo – motor skill, requiring the child to simultaneously use a range of component skills. Clearly, most children will increase their skills with scissors if they have opportunity to practise using them regularly.
Scissor skills can be supported through scissor specific activities but there are a number of component parts to help develop scissor skills. If any of these skills are absent or poorly integrated, a difficulty may occur in tryingto use scissors correctly.
Below are the components which give the child a base to develop their scissor skills. It is worth investing time to check these skills and use the programmes outlined below to develop these component skills. A child doesn’t necessarily need to have scissors in their hand to work on skills to aid scissor cutting skills.
|
Components of scissor skills |
Associated 1st Move programmes |
|
Understanding of task |
No programme but check child’s understanding |
|
Attention and listening skills |
Look at First Call (Lincolnshire Speech & Language resource) |
|
Visual perceptual skills |
Visual perception |
|
Good sitting balance |
Balance and strength |
|
Eye/hand coordination |
Fine motor skills |
|
Ability to isolate fingers |
Fine motor skills |
|
Grasp and manipulation |
Fine motor skills |
|
Bilateral integration/coordination (mainly upper limb) |
Bilateral integration. Fine and/or gross motor |
|
Shoulder girdle stability |
Strength activities |
Checklist
What to do next
When developing scissor skills, remember focus on:
- Quality movement (short and focused)
- Regularly practice
- Using it in real situations
Also:
- Allow for the child’s level of development
- All movements start big before refining to small
- Allow children to develop increasing precision
- Minimise frustration
- Use appropriately sized equipment
Preparation
Ensure that the child is in a good position. Table and chair at the right height and the child is well positioned with their feet on the floor.
Ensure that the scissors are sharp enough to cut
– many scissors given to students at the learning stage are blunt, loose and awkward to use.
Single loop scissors are especially hard to hold. Junior ‘Fiskar’ style scissors are often chosen by children for ease of use. Try the scissors yourself, can you use them?
This sounds obvious, but the fact is that something so simple could make a great deal of difference to the success of the child and minimise both of your frustrations!
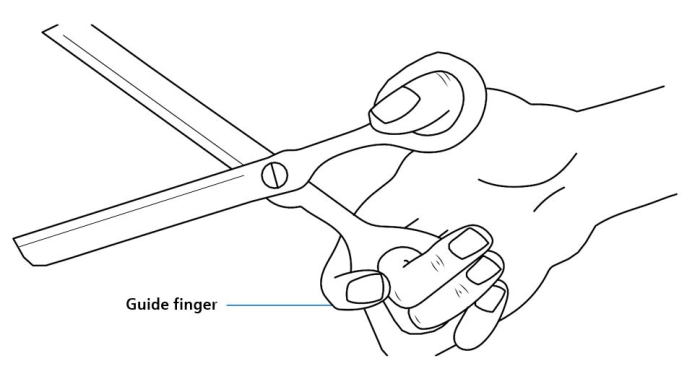
Teach a good grasp. To hold the scissors well the child needs to isolate the middle finger and thumb to go into the scissor loops. The index finger should be used as a guide finger stabilising the lower loop.
Games to promote scissor skills
Games using a variety of tongs and squeeze operated toys help develop the opening and closing hand action needed for cutting. Whatever equipment is used, check it mimics the scissor action. Some activity ideas are shown below at the end of this section.
Starting
Get the child to make short snips on card or firm paper. The finer the paper the harder it is to cut. Progress to cutting on a thick dark line and stop where the line stops. Use creative ideas eg. lanterns for Halloween are excellent for scissor
practice. Make this more challenging by reducing the width of the guide line, then introduce a gradual curve or wavy line.
Direction
When children reach the stage of cutting around shapes, guide them to work in an effective way.
- Left-handers cut in a clockwise direction
- Right-handers in an anti-clockwise
Using this approach avoids the point of the scissors pointing towards the wrist on the opposite hand.
There are a number of books available that can be photocopied that have outlines for the children to cut. Begin with the simple lines and progress to more complex shapes. Of course, these don’t have to be specially purchased resources; by thinking through the child’s level of skill, attention and interest these could be very simply made.
Pick-up games
Purpose
To practice opening and closing tools like scissors
Materials
-
Two buckets or other containers
-
Salad servers, salad or bread tongs or other tong-type tools
-
Bells, aluminium foil balls, cotton balls, plastic toys (or anything else that could be picked up
– be creative!)
The activity
Have the objects in one of the buckets/ containers. Have the child pick up an object and transfer it to the other container using the tongs. Make it stimulating and fun!
Variations
Place the objects in sand or (if you’re brave) soapy water! Do consider environment, it could be messy!
Paper punch games
Purpose
To practice directing a tool in a forward motion
Materials
-
Paper punch
-
Stiff paper or index cards
-
Crayons or marking pens
Three activities
-
Have the child use the paper punch to make random holes in the stiff paper. The child can then lace the card or connect the holes with crayon lines.
-
Draw coloured dots or small circles on the paper or card. Have the child punch out the coloured pattern.
-
Draw a path on a piece of stiff paper and put a house, star, sweet shop or appropriate target of interest at the top of the paper. The child punches holes along the path to the destination (Caution – adults enjoy these activities too!)

Resources, equipment and suppliers
Resources
Pre-Scissor Skills – Skill Starters for Motor Development by Marsha Dunn Klein, M.Ed , O.T.R. Therapy Skill Builders a Division of the Psychological Corporation
Equipment
-
Stiff paper or card
-
Scrap paper or card
-
Good quality scissors
Suppliers
-
ESPO Catalogue
-
LDA
-
Office/stationery suppliers
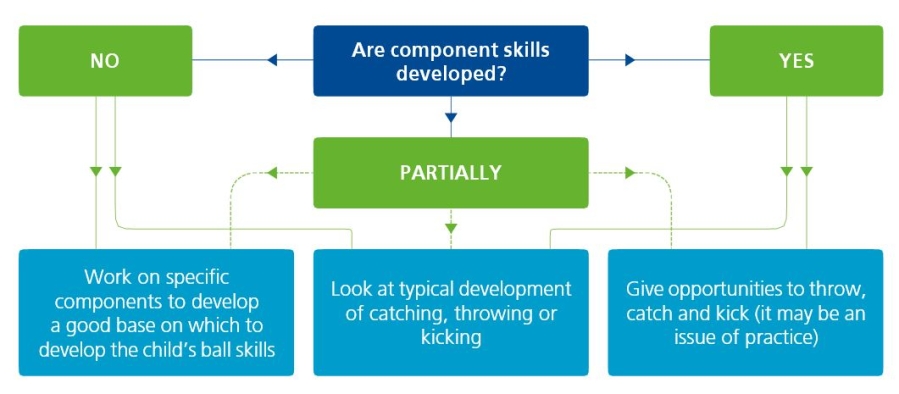
The development of ball skills depends on the child’s sound foundation of the core skills. To throw or kick a ball, the child must have developed some ability in the understanding of his/her body in space, the strength to carry out the action and the balance to maintain the posture. They must also have begun to develop visual perception to appreciate distance and direction, timing and the emphasis required in throwing, catching or kicking.
Ball skills can be supported through ball specific activities but there are a number of component parts to help develop ball skills. If any of these skills are absent or poorly integrated, a difficulty may occur in throwing, catching or kicking correctly.
Below are the components which give the child a base to develop their throwing, catching and kicking. It is worth investing time to check these skills and use the programmes outlined below to develop these component skills. By practising these component skills, gains will most likely be seen when direct ball skills are practiced.
|
Components of ball skills |
Associated 1st Move programmes |
|
Understanding of task |
No programme but check child’s understanding |
|
Visual Perceptual skills |
Visual Perception |
|
Moving from one leg to another |
Balance and strength |
|
Maintaining strong postures |
Strength |
|
Moving a joint with force |
Strength |
|
Eye hand coordination |
Finer motor skills |
|
Grasp and manipulation |
Finer motor skills |
|
Coordinating both sides of the body |
Bilateral integration fine and/or gross motor |
Checklist
What to do next
When developing ball skills, remember focus on:
- Regular practice
- Helping the child organise the sequence of catching, throwing and kicking
- Helping the child develop confidence
- Careful consideration of where to practice
- Giving sufficient time (it always takes longer than adults expect)
- Using it in real situations
Also:
- Allow for the child’s level of development
- Allow children to develop increasing precision
- Minimise frustration
- Use appropriate equipment (size and type)
Typical progression of development
When supporting throwing, catching and kicking skills it is important to bear in mind the typical progression of development. Understanding the pattern of development is central to promoting realistic expectations, effective progress and minimising frustrations.
Developmental sequence of underarm throwing
Rudimentary
Throwing ball underarm with feet stationary
- Stands with feet shoulder width apart
- Swing throwing arm downward and forward without follow through
Functional
Throwing ball underarm while stepping forward on the same side
- Swings throwing arm down and forward on the same side
- Releases ball and follows through with throwing arm
Mature
Throwing ball underarm while stepping forward with opposite foot
- Swings throwing arm forward and upward, stepping forward with the opposite foot
- Then swings throwing arm downward
- Releases ball and follows through with throwing arm
Developmental sequence of overarm throwing
Rudimentary
Throwing ball overarm with feet stationary
-
Stands with feet parallel and stationary
-
Throws with hand passing over shoulder, crossing in front of body diagonally
Functional
Throwing ball overarm while stepping forward on the same side
-
Steps forward with foot on the same side as throwing arm
-
Throws ball with hand passing over shoulder
-
Follows through with throwing arm
Mature
Throwing ball overarm while stepping forward with opposite foot
-
Steps forward with the opposite foot
-
Throws ball with hand passing above shoulder
-
Follows through with throwing arm
Developmental sequence of catching
Rudimentary
Trapping ball against chest with both hands
-
Extended arms forward
-
Catches ball against chest with arms and hands
Functional
Catching ball with both hands with feet stationary
-
Extends bent arms forward with feet stationary
-
Catches ball with hands away from body
Mature
Catching ball in both hands while moving
-
Extends bent arms forward
-
Moves towards ball as it is caught
-
Brings ball close to body
Development sequence of kicking
Rudimentary
Kicking the ball from the knee
-
Stands near ball with knee bent
-
Pushes ball forward with foot
-
Straightens leg forward after kick
Functional
Kicking the ball with minimal follow through
-
Stands near ball with knee bent
-
Straightens knee before touching the ball
-
Kicks with minimal arm-leg opposition
-
Continues to move kicking leg forward after the kick
Mature
Walking forward, stopping and kicking the ball with follow through
- Takes one or more steps towards the ball
- Places support foot near ball with arm-leg oppositions
- Straightens leg before touching the ball
- Kicks the ball forward
- Continues to move kicking leg forward after kick
Throwing
POINTS OF NOTE: Targets should be large initially as it is the successful action that is important. Progression is through making the targets smaller eg. from throwing into a large hoop to knocking over a skittle. Again, we follow the principle of big to small. Altering distance and direction develops aim and ‘weight of throw’.
Equipment
- Football
- Tennis ball
- Bean bag
- Hoops
Activities
One handed overarm throw
If the child is to use the right hand to throw, the left foot is the one to take a small step forward. The right hand is drawn straight back. As the child throws the throwing hand follows through and the weight shifted to the leg (this will be reversed for aleft-handed throw). The child is encouraged to look at the target throughout.
- Throw beanbag as far as possible
- As high as possible
- As hard as possible
One handed overarm throw
If the child is to use the right hand, the left foot is forward. The child’s shoulders should be at 90° to the target i.e. side on and the left hand pointing towards it. The right arm is bent, elbow pointing down with the hand drawn back almost touching the right ear. On the throw, the shoulders turn so that the right hand is forwards pointing at the target and the left hand is behind.
- Throw bean bag into hoops directly in front at distances 1m, 3m, 5m
- Throw bean bag into hoops placed to the right and left
- Throw bean bags at skittles
- Throw football to and from partner (both hands underarm)
- Throw, bounce and catch to partner (both hands overarm)
- Throw tennis ball to partner, or target on wall
- Two handed throws
- Throw football to and from a partner (both hands underarm)
- Throw, bounce and catch to partner (both hands overarm)
Catching
POINTS OF NOTE: Some children have difficulties with an object thrown in their direction and can have quite severe adverse reactions. In the early stages it should be taught slowly and sympathetically. Very immature catches are those where the child has a static standing posture, outstretched arms and catches into the body.
Equipment
- Tennis ball
- Balloon
- Soft toy
- Skipping rope
- Football
- Beach ball
Activities
Familiarity with the ball
- The child sits on the floor and rolls the ball underneath bent knees, around the body
Rolling
- The child rolls the ball to and from a partner
- The child rolls the ball around an obstacle course using different parts of the hand
- The child taps a balloon into the air
Throw – catch
(Be aware of the three developmental stages of catching and work towards them with each type of object)
- The child taps a balloon to and from a partner
- The child catches a thrown skipping rope
- The child catches a thrown ‘teddy’
- The child catches a beach ball
- A football
- A small ball
- Bounce and catch a football to each other starting at 1m and taking one step back every successful catch
- As above with tennis ball
- Throw, bounce and catch off a wall
- Throw and catch off a wall
Kicking
POINTS OF NOTE: The dominant foot is usually the ‘preferred’ foot to kick with but not always. Kicking a ball coming towards the child is easier than kicking a stationary one. Use arms out to the side for balance. The child’s head should be over the ball and the ball looked at throughout. The non-kicking foot is by the side of the ball. The kicking leg is bent and swings through as it straightens and strikes. The kicking leg follows through in the direction of the target.
Equipment
- Football
- Cones
- Chairs
Activities
Stand/kick
- The child stands between two chairs, holding one with each hand for balance. A ball is rolled slowly towards him and the child kicks it back with his preferred foot
- As above and kicks as hard as possible
- Remove chair on non-kicking side and repeat as above
- Remove remaining chair
Move/kick
- Run to stationary ball and kick
Aim/kick
- Kick ball into goal 1m apart
- Partner work
- Stop with foot on oncoming ball and kick back to partner
- Kick ball to partner as partner is moving about
Drop kick
- Hold the ball, drop and kick
Control on the move
- Dribble ball around area
- Dribble ball around cones
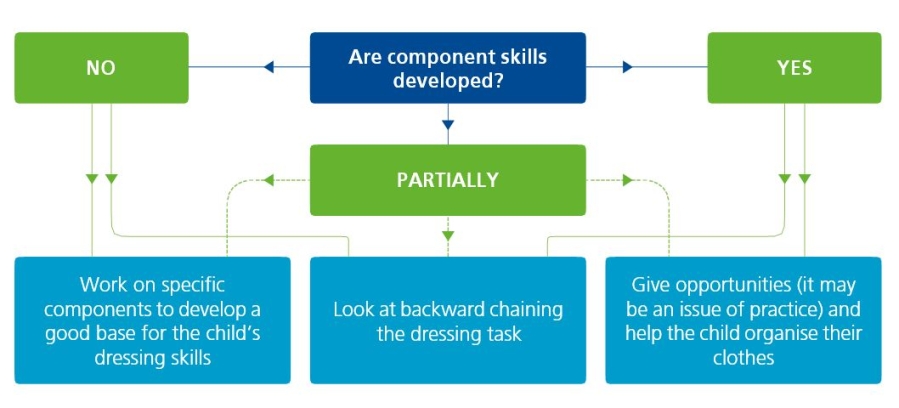
Dressing is a complex perceptual motor activity. It is best practised when in real situations eg. changing for P.E, swimming, dress up games etc. Clearly, this is a skill area that should be supported sensitively and in line with all health and safety and child protection guidelines.
Clearly, most children will increase their dressing skills if they have opportunity to practice using them regularly and with sufficient time and support to organise and dress in an effective way. Adults who do too much or too little can be inadvertently maintain a child at a lower level of independence.
Dressing skills can be supported through dressing specific activities but there are a number of component parts to help develop dressing skills. If any of these skills are absent or poorly integrated, a child may have difficulty trying to dress successfully.
Below are the components which give the child a base to develop their dressing skills. It is worth investing time to check these skills and use the programmes outlined below to develop these component skills. By practising component skills can facilitate better dressing skills when the are practiced.
|
Components of dressing skills |
Associated 1st Move programmes |
|
Attention and listening |
Look at First Call (the Lincolnshire Speech & Language resources) |
|
Balance |
Balance and strength |
|
Orientation |
Body/spatial awareness activities |
|
Eye hand coordination |
Fine motor activities |
|
Fine motor skills |
Fine motor activities |
|
Sequencing |
Look at First Call (the Lincolnshire Speech & Language resources) |
Checklist
What to do next
When developing dressing skills, remember focus on:
- Regular practice
- Helping the child organise the sequence of dressing
- Helping the child organise the clothes
- Careful consideration of where to practice
- Giving sufficient time (it always takes longer than adults expect)
- Using it in real situations
Also:
- Allow for the child’s level of development
- Allow children to develop increasing precision
- Minimise frustration
- Use appropriately sized clothing
- Have sufficient space to get dressed (children need more space than adults sometimes realise)
Preparation
If the child has difficulty with organisation – give clear instructions. If the child has difficulty getting things in the right order,
try pictorial representations of the correct sequence as listening to instructions and doing, may be too difficult. Checklists and visual schedules are very helpful in supporting organisation and it may be helpful to teach a routine to help shape organisation.
Ensure they have all clothes together when going to change for P.E or back. Sitting down with back against wall prevents overbalancing or getting into other children’s body space.
If the difficulty is with getting things the right way round, mark back and front as necessary.
General ideas if a child is having a lot of difficulty
Suggestions:
- Avoid complicated garments
- Buy clothes on the large size
- Shirts, T-Shirts and jumpers with set in sleeves are more difficult than the raglan style
- Loose trousers with elasticated waists are easier to manage
- Use Velcro for fastening if necessary
- Tube socks with no definite heel require less manipulation to get a comfortable fit (but can be difficult to find/buy)
- Shoes that slip on or are closed with Velcro are easier to get on and off
- Elastic shoelaces are available; these are permanently tied but ‘give’ as the foot goes back into the shoe
- Try backward chaining (see below)
- Use visual organisers
Backward chaining teaching technique
Backward chaining is an approach which allows a child to achieve a goal. A task is split into steps (like the links in a chain) and the child is taught to do the last step of the task to achieve the goal. The child should always be experiencing success in finishing the task and developing the self-confidence required to learn.
Put simply, the adult starts the task and the child finishes the task off. Gradually, the adult does fewer steps and the child does more until the child can carry out the whole task.
Adult starts the task (steps 1,2,3) eg. putting a coat on and half zipping it up. Child finishes the task (step 4) eg. pulls the zip up to the top.

The technique can be adapted to teaching a wide range of activities. The task can be broken down into small or as large steps as required.
Backward chaining approach applied to dressing/undressing
Example: Goal: Removing a T-Shirt
Backward chaining – adult supports/helps student through entire process leaving the last part or parts for the student to achieve:
- Student just removes t-shirt from head
- Student removes t-shirt from neck
- Student removes t-shirt with one arm in and one arm out
- Student removes t-shirt with one arm in and one arm half out
- Student removes t-shirt when both arms are in sleeves and t-shirt has been pulled up at the shoulders
- Student removes t-shirt
Example: Goal: Put on socks
Backward chaining stages:
- Student pulls up sock from just above heel
- Student pulls up sock from just below heel
- Student pulls up sock after toes have been placed in
- Student pulls on sock after handed to them with the heel in the correct position
- Student puts on sock with heel in correct position
Example: Goal: Tying shoelaces
Backward chaining stages:
- Start to do up the laces: explain what you are doing, i.e ‘Cross the laces over, put the lace which is at the back around and through the hole, pull tight, make a loop/rabbit’s ear, put the other lace around the loop/rabbit’s ear and under the bridge/down the burrow to make another loop/rabbit’s ear. This story form may be helpful to a child by linking the parts together in a logical sequence
- Ask the child to help you: ‘pull the loops/ rabbit’s ears’. Praise the child for helping to do up his laces. This is the first step taught
- Once the child has mastered this, they may then ‘pull the loops/rabbit’s ears themselves, then ‘push the lace through to make loop/ rabbit’s ear’ and so on. Eventually, the child will be able to do their laces from start to finish.
General notes
- Do each dressing task the same way each time so a predictable series of steps is repeated
- Describe what you are doing as you are doing it, for example@ ‘Now I am putting your left leg in’
- Remember undressing is learned before dressing
- Give sufficient time to react
Visual support strategies
Visual support strategies can be used in a variety of situations to promote independence and prompt a child to remember sequences correctly. This is particularly relevant to developing self-care skills such as dressing, use of the toilet, getting ready for school and independent working habits in the classroom.
Visual timetables
A timetable of events can be a helpful reminder and promote understanding of the relationship between events over time. Put simply, knowing when things are going to happen. Drawings, pictures, photos and labels can be used effectively to simply list the events of the day.
Visual schedules
Activities and tasks that have a sequence or can be broken down into steps can be supported through visual schedules (just like a set of furniture assembly instructions). Using pictures and drawings to indicate each step of the task can simplify complex activities such as remembering which order to put clothes on, bathroom routines (including washing hands and flushing the toilet!). Not too many steps should be included and many will help all children eg. a hand washing schedule above the sink would act as a reminder for all children.
Bunny ears method of tying laces
Skill: Fasten shoe by tying laces
Adapted technique: ‘Bunny ears’ or ‘two-loop tie’ method
The method requires less refined lead-assist action and fewer different steps than the standard approach.
Materials: Shoe and long shoelaces
Position: A comfortable, balanced sitting posture (remember some children are helped by sitting back against the wall)
Resources
Pre-Dressing Sills by Marsha Dunn Klein Skill Starters for Motor Development by Marsha Dunn Klein, M.Ed, O.T.R Therapy Skill Builders a Division of the Psychological Corporation.
Procedure
This has been presented as forward chaining (this is the child starting from the beginning of the task). Backward chaining could also be used.
- Pick up shoelaces
- Cross laces, laying them across the front of shoe
- Put upper lace under the crossed laces through the cross created with the shoe in a toe-to-tongue direction
- Grasp a lace in each hand and pull tight
- Make one loop
- Make a second loop with the other shoelace
- Cross loops across the front of shoe, maintaining grasp on the loops (same action as step 2)
- Put upper loop under crossed laces through the triangle created with the shoe, in a toe- to-tongue direction (same action as step 3)
- Grasp a loop in each hand and pull tight
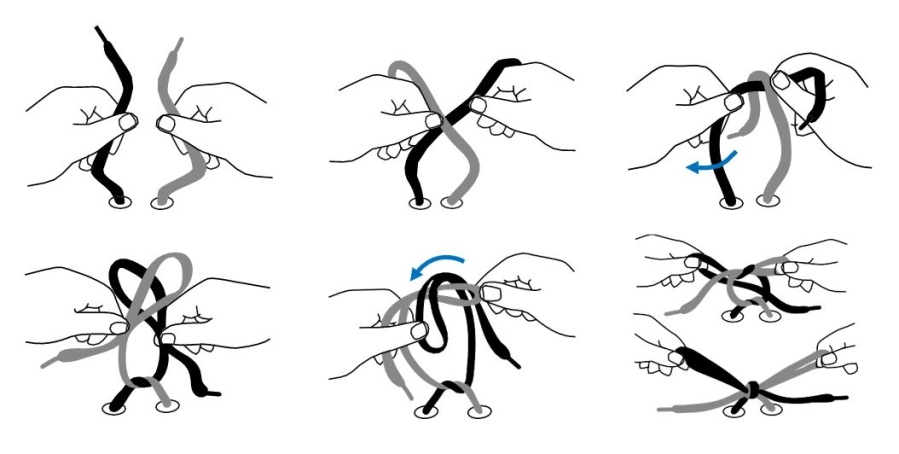
These activities are complex. This information addresses only the practical aspects involving coordination. Medical, behavioural and sensory aspects may also need to be considered, as appropriate to individual children.
Remember, the involvement of home is very important in the development of a child’s self-care skills. This is a skill area that should be supported in line with all health and safety guidelines. Most children will increase their eating and drinking skills if they have opportunity to practice using them regularly
and with sufficient time and support to organise themselves in an effective way. Adults who do too much or too little can inadvertently maintain a child at a lower level of independence.
Eating and drinking skills can be supported through specific activities but there are a number of component parts to help develop eating and drinking skills. If any of these skills are absent or poorly integrated, a child may have difficulty managing the tasks successfully.
Below are the components which give the child a base to develop their eating and drinking skills. It is worth investing time to check these skills and use the programmes outlined below to develop these component skills. Practising component skills can facilitate better eating and drinking skills.
|
Component Skills |
Associated 1st Move programmes |
|
Attention and listening |
Look at First Call (the Lincolnshire Speech & Language resource) |
|
Visual perception |
Visual perception |
|
Eye hand coordination |
Fine motor activities |
|
Bilateral coordination/integration |
Bilateral integration fine and/or gross motor |
Checklist
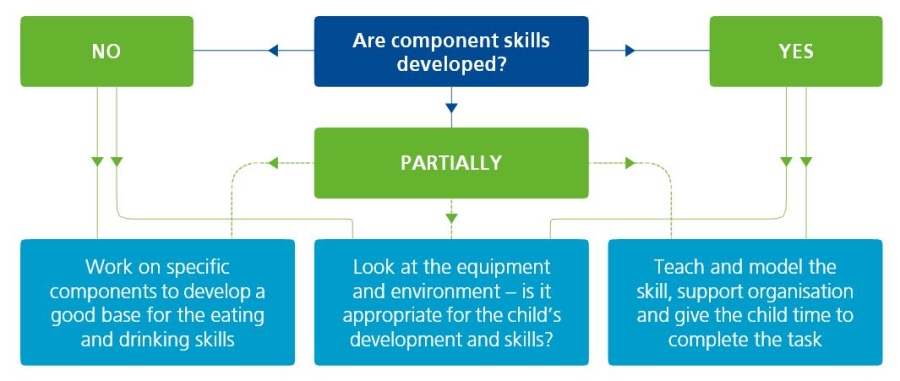
What to do next
When developing eating and drinking skills, remember focus on:
- Regular practice
- Helping the child organise the sequence of the eating task
- Careful consideration of when and where to practice
- Giving sufficient time (it always takes longer than adults expect!)
Also:
- Allow for the child’s level of development
- Allow children to develop increasing precision
- Minimise frustration
- Use appropriately sized equipment
- Have sufficient space to eat (children need more space that adults sometimes realise)
- Adults should slowly move from telling the child what to do, to using prompt questions
Posture/positioning
Table and chair must be at the correct height (see handwriting section on good sitting position). If the child is learning to use cutlery they may work with elbows out to the side, especially for elbow movement. Keep area next to child clear.
Drinking
Drinking is a complex motor task but is perhaps more simple than eating (from an eye-hand coordination point of view).
How to help:
- Consider the type of cup
- A beaker with a handle may be easier for some children than one without a handle
- Make sure it isn’t a finger trapping handle
- Use a sturdy, broad based cup
- Do you want it to be able to bounce?
- Do not overfill the cup/beaker! It is better to refill than have a spill. Perhaps think of quarters – a splash, quarter full, half full, three quarter full
- Avoid clutter so a child reaching for the cup/ beaker is less likely to knock it over
- Wide base and big handles are helpful
- Small handle are less useful
- Narrow bases can be unstable
Eating
Ensure not too much is going on in the environment to allow the child and adult to focus on the task.
Support the child to organise the task of what they are going to eat.
The child needs to coordinate two hands together and be able to carry out different actions with either hand, eg. hold item with fork and cut with knife.
The child may need to be taught/shown how to cut. You can try and practice with play dough to get the action right (ensure adequate space for elbows so keep the area next to the child clear – nobody likes a low flying elbow in the ear!).
Try different types of cutlery:
- Junior caring cutlery (small hands)
- Caring cutlery (larger hands) helps child position index finger, which improves hand position
If plates slide, try some Dycem (a range of non- slip materials www.dycem.com) or other non-slip mat under the plate.
Packed lunches
Opening packets etc. depends on fine motor skills and strength of grasp. Clearly fine motor activities could be used to support these skills. Also, the type of lunchbox can cause problems for some children. Some boxes have tight lids or tricky catches; again careful choice of lunch box and fine motor activities will help.
In addition, the actual organisation of what to eat and what order, can be a challenge for some children faced with a full lunch box, especially in a busy, interesting environment and support to focus and organise themselves may be helpful.
Organisational prompts
Some children find sequencing what to eat tricky. This can be supported through organisational prompts:
- Visual prompts
- Questions
Visual prompts
Visual prompts can act as a structure for children allowing adults to provide structure without directly guiding the child through the task. It may be helpful to:
- Label – some parents have found it helpful to put a numbered label on each food item eg. a ‘1’ on the bag of sandwiches, ‘2’ on the crisps, ‘3’ on the cake wrapper
- Sequence placemat – a laminated, numbered placemat may help the child put the food out and sequence the food in order
- Picture checklist – a very simple menu with a picture (and word) sequence of what to eat
Questions
Questions are a very powerful tool for adults to use. If adults are over-directive, children will not necessarily internalise the skills to think through a task for themselves. Adults can use simple questions to help a child plan eating their lunch eg. ‘What are you going to eat first?’ ‘Shall we unpack some of the things to give you more room?’ Clearly, working closely with home can resolve a lot of these issues.
1st Move has been developed by Lincolnshire County Council working in partnership with Lincolnshire Community Health Services NHS Trust.
The resource has been produced as the result of joint work involving Occupational Therapists, Physiotherapists, Educational Psychologists and Teachers.
Support agencies
It is expected that most children will have their movement needs met through the implementation of this 1st Move resource and opportunity to practice their skills. Some children’s progress will be slow, but in line with their general development, this should not necessarily raise a need for Physiotherapist or Occupational Therapist involvement.
However, should there be significant motor concerns regarding a child, it may be appropriate to involve Physiotherapy or Occupational therapy services for further advice. Should there be concerns regarding supporting the child’s learning, acquisition of skills and development, it may be appropriate to discuss concerns with an educational psychologist.
Where children's therapy services are to be contacted they will need information about:
- What the main areas of concern are
- How 1st Move has been implemented
- What other action have been taken to support the child
Childrens’ Physiotherapists and Occupational Therapists
Childrens’ Physiotherapists identify the reasons for a child’s movement difficulty and give carers the knowledge and skills to address them.
Support may be in the form of general advice on beneficial activities, appropriate changes to the environment or it may be a specific programme of activities/exercises to help the child learn and consolidate new movement skills.
Childrens’ Occupational Therapists can offer advice on general hand skills development, handwriting and independence skills.
Educational Psychologists
Educational Psychologists help solve problems which interfere with the development and education of children and young people.
Educational Psychologists are trained in the psychology of learning and child development. Support may be through direct work with a child, parents and teachers or through consultation or developing systems at a class or school level.
Contacts
Up to date contact details for the Children’s Occupational Therapy and Physiotherapy Services can be found via the website www.lincolnshirecommunityhealthservices.nhs.uk
The Educational Psychologists team can be contacted via the website www.lincolnshire.gov.uk
References
References and acknowledgements of materials consulted or quoted from in the production of this pack.
ACE Centre Advisory Trust, Waynefleet Road, Headington, Oxford, OX3 8DD
Case Smith, J;Allen, A.S; Pratt, P.N (Eds) ‘Occupational Therapy for Children’ (Third Edition) C.V Mosby Co.
Chapman, L (1997) ‘Occupational Therapy Approaches for Children with Handwriting Difficulties’: Lecture Notes
Dunn Klein, M. Pre-Scissor Skills Skill Starters for Motor Development’ Therapy Skill Builders:
a Division of the Psychological Corporation
Ehrhart, Rhoda P. (1994) ‘Development Hand Dysfunction: Theory Assessment and Treatment’ (Second Edition) Therapy Skill Builders
Jenkinson, J. (nd) Fine Motor Activity Ideas
Johnson Levine, K. (1991) ‘Fine Motor Dysfunction in the Classroom’ Therapy Skill Builders: a Division of the Psychological Corporation
Kramer, P.; Hinojosa, J. (1993) ‘Frames of reference in Occupational Therapy’
Olsen, J.Z . (2003) Handwriting without tears
Sassoon, R. (1990) ‘Handwriting, the way to teach it’ Stanley Thornes
Useful resources
You may find these helpful:
Pre-Dressing Skills by Marsha Dunn Klein. Skill Starters for Motor Development’ by Marsha Dunn Klein M.ed., O.T.R Therapy Skill Builders: a Division of the Psychological Corporation
Pre-Scissor Skills Skill Starters for Motor Development’ by Marsha Dunn Klein M.ed.,
O.T.R Therapy Skill Builders: a Division of the Psychological Corporation
Pre-Writing Skills Skill Starters for Motor Development’ by Marsha Dunn Klein M.ed.,
O.T.R Therapy Skill Builders: a Division of the Psychological Corporation
Loops and Other Groups by Mary Benbow M.S OTR. Therapy Skills Builder: a division of the Psychological Corporation
Hands at Work and at Play: Developing Fine Motor Skills at School and at Home. Knight, J.M & Gilpin Decker, M.J Therapy Skill Builders
Handwriting Without Tears by Jan Z Olsen (2003) Dycem www.dycem.com
Lucky Letters Programme by Coralee Lawrence Rainbow Road Resources www.rainbowroadresources.com.au
Write from the start: Unique Programme to Develop the Fine Motor and Perceptual Skills Necessary for Effective Handwriting